Monday, January 14, 2013

TKO: Flower Hair Clips

While I was pregnant, I was bored at home and always looking for new crafts to conquer.  One day while perusing the local Dollar Tree, it occurred to me that I could make some cute, girly hair stuff for pretty cheap.  I stocked up on jewels and flowers and the rest is history.  These flower hair clips are so easy to make, definitely not worth the $4+ that they charge in the store, and they make a great gift for girls (and women!) of all ages.  Plus, they come together really fast!


You will need:  Artificial flower, scissors or craft knife, hot glue gun and glue, jewel, alligator hair clip, felt, shelf liner, and 3/8" ribbon.

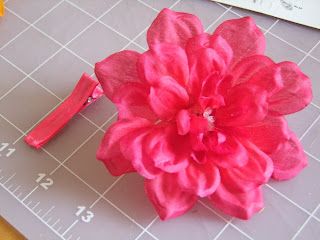
Prep your alligator clip.  (See Bow Clip tutorial for how-to.)  Remove flower from stem.

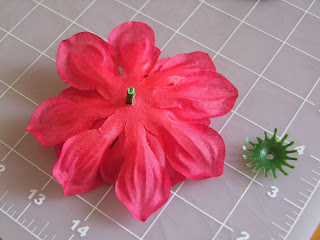
Flip flower over and take apart, removing all plastic pieces.

Flip over again, arrange layers of petals, and lay flat.  Use hot glue gun to tack layers together.  Tack towards the center.

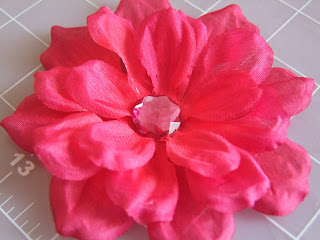
Glue jewel in center.  This is pink on pink, but be creative, you can use any color combination you like!

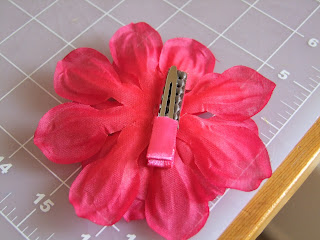
Glue securely onto clip.  Be generous!  Especially, if this is for a young child as they might be a tad rough.

They can be worn alone, or added to a nice headband, which I often find in 3- or 4-packs for $1 at HEB or Fiesta Mart. 

Knotty Know Know:  All flowers are not created equal.  Look for flowers that can easily be taken apart and laid flat.  Nothing puts a damper on a quick project like a feisty flower.

Knotty Knock-Off: Bow Hair Clips

This Knotty Knock Off comes via the Make It and Love It blog, where she shows us how to make Simple Hair Bow Clips.  It is a great tutorial, and I made a dozen myself before getting squirrely and adding my own mischief to the design.  I added a jewel and changed up the no slip part.  For this project, you will need: three 4 1/2" strips of 3/8" ribbon, one alligator clip, one jewel, felt (optional), shelf liner, and a glue gun.


The pink ribbon is satin.  I treated the ends with Fray Check, which can be purchased anywhere craft supplies are sold.  When using grosgrain, like the yellow shown below, heat seal the ends with a lighter.

Notice the alligator clip I'm using has a point on the end, rather than the prongs.  It works just fine, so don't worry if you have one type or the other.  I bought these on Amazon.com. 

Cover the clip with one piece of ribbon, making sure you glue neatly, but generously to hold in place.  This part of the clip will be handled the most.  Make two loops with the other two pieces.  Glue to tack.

Stack loops to form a bow shape.  Tack together with glue.  Then, glue the bow on the clip and the jewel on the bow.

Open clip and glue your felt, then shelf liner inside.  On the Make It and Love It, she uses white.  So did I until it occurred to me that brown would look better in my daughter's hair.  The clasp seems to disappear and the bow is showcased more prominently.  You can even cover the clip with brown ribbon (or hair-colored ribbon, if not brown) to further accentuate the bow on top.  Also, sometimes I'm lazy and don't use the felt!


Knotty Know Know (Tip):  Don't close this clip until glue is completely dry! 
(duh, right?)  I've done it, more than once, and the glue is difficult to get off without bending the clip.
Okay, you're done!